
Linux Tips and Tricks (Ubuntu, Debian)
This post is to summarize some interesting but special usage which is out of normal linux commands. For basic Linux commands, you can find it from my previous post.

Related Posts:
Convert NTFS to EXT4 in Linux
-
Format the disk (or partition) to ext4
To format the whole disk or a partition, use the following command:textsudo mkfs.ext4 /dev/sdX1Replace
/dev/sdX1with your USB disk partition. If your disk has multiple partitions and you want to format the entire disk, consider creating a new partition table first and then formatting the partition you create.
root@pi:~# mkfs.ext4 /dev/sda1 mke2fs 1.47.0 (5-Feb-2023) /dev/sda1 contains a ntfs file system labelled '1T' Proceed anyway? (y,N) y Creating filesystem with 244190008 4k blocks and 61054976 inodes Filesystem UUID: 432f2c49-5a45-42ca-9138-6b576c7c5ddd Superblock backups stored on blocks: 32768, 98304, 163840, 229376, 294912, 819200, 884736, 1605632, 2654208, 4096000, 7962624, 11239424, 20480000, 23887872, 71663616, 78675968, 102400000, 214990848 Allocating group tables: done Writing inode tables: done Creating journal (262144 blocks): done Writing superblocks and filesystem accounting information: done
Read / Write Disk Performance Test
Using dd for Disk Read Testing
-
Write a test file (if you don't already have one):
textdd if=/dev/zero of=/tmp/testfile bs=1M count=1024 conv=fdatasync
-
This writes a 1GB file to
/tmp/testfilewithconv=fdatasyncensuring data is physically written to disk.
-
Clear the Linux buffer cache to avoid reading from memory cache:
textsudo sh -c "echo 3 > /proc/sys/vm/drop_caches"
-
Run the read test by reading the file to
/dev/null:
textdd if=/tmp/testfile of=/dev/null bs=1M count=1024
-
This reads the 1GB test file and discards the output, measuring the read throughput from disk.
root@pi:~# dd if=/dev/zero of=/mnt/usb1/data/testfile bs=1M count=1024 conv=fdatasync 1024+0 records in 1024+0 records out 1073741824 bytes (1.1 GB, 1.0 GiB) copied, 135.585 s, 7.9 MB/s root@pi:~# dd if=/mnt/usb1/data/testfile of=/dev/null bs=1M count=1024 1024+0 records in 1024+0 records out 1073741824 bytes (1.1 GB, 1.0 GiB) copied, 42.2893 s, 25.4 MB/s root@pi:~#
root@pi:/mnt/usb1# dd if=/dev/zero of=/mnt/usb1/testfile bs=1M count=1024 conv=fdatasync 1024+0 records in 1024+0 records out 1073741824 bytes (1.1 GB, 1.0 GiB) copied, 39.3389 s, 27.3 MB/s root@pi:/mnt/usb1# dd if=/mnt/usb1/testfile of=/dev/null bs=1M count=1024 1024+0 records in 1024+0 records out 1073741824 bytes (1.1 GB, 1.0 GiB) copied, 41.8176 s, 25.7 MB/s root@pi:/mnt/usb1#
Ubuntu CLI Cheat Sheet


Ubuntu Pro
- https://ubuntu.com/pro/tutorial
- pro --version
- sudo apt install ubuntu-advantage-tools
- pro security-status
- pro security-status --help
- pro help esm-apps
- sudo pro attach [YOUR_TOKEN]
To ensure that all available CVE fixes are applied, run:
$ sudo apt update && sudo apt upgrade
Configure DNS Server for your Linux
1. Check current dns server in /etc/resolv.conf
2. Modify DNS server
On Ubuntu 24.04, the DNS server specified in the netplan configuration (such as
) will be the one in effect, not the DNS listed in /etc/resolv.conf (such as
DNS Resolution Flow
-
Netplan sets DNS servers via YAML files, which are then picked up by the system's network renderer (NetworkManager, systemd-networkd, etc.), configuring systemd-resolved as the authoritative source for DNS settings.
-
/etc/resolv.conf is commonly a symbolic link automatically managed by systemd-resolved and overwritten on boot or after networking changes.
-
Manual changes to /etc/resolv.conf are temporary and will be overridden by what is set in Netplan or systemd-resolved configurations.
Which DNS Will Be Used?
-
If netplan has DNS configured (such as1.1.1.1 ), it will instruct systemd-resolved to use it, and systemd-resolved will manage and update /etc/resolv.conf accordingly.
-
The DNS that is actually queried by applications will be the one provided via netplan (and thereby systemd-resolved), not whatever has been manually set in /etc/resolv.conf.
-
To see the effective DNS server, use:
- resolvectl status
- systemd-resolve --status
Summary Table
| Configuration File | Effect on DNS | Persistence |
|---|---|---|
| Netplan (.yaml) | Takes effect | Permanent |
| /etc/resolv.conf (manual edit) | Overwritten/ignored | Temporary/unreliable |
List All Running Services
systemctl --type=service --state=running
Add user into sudo / wheel
adduser newuser
passwd newuser
On Ubuntu:
- usermod -aG sudo newuser
On CentOS:
- usermod -aG wheel newuser
Manually Change IP
Ubuntu:
- Before version 17.10, edit file /etc/network/interfaces
- Starting with 17.10, Netplan is the default network management tool
- ip link
- nano /etc/netplan/01-netcfg.yaml
- netplan apply
CentOS
- “nmcli d” command in your terminal for quick list ethernet card installed on your machine:
- “nmtui” command in your terminal to open Network manager.
- IPv4 configuration <Automatic>
- [x] Automatically connect
- service network restart
- ip a
There are more ways to configure static ip on Raspberry PI:
- https://blog.51sec.org/2020/04/install-ubuntu-2004-on-raspberry-pi.html
Check Your Public IP Address from CLI
Following commands can show you what the public ip address is for your linux machine if it can connect to Internet.
- curl -s
checkip.dyndns.org
|sed -e 's/.*Current IP Address: //' -e 's/<.*$//'
- curl
icanhazip.com
- curl http://
ipv4.icanhazip.com
- telnet
www.checkmyip.com
80 | grep confidence | grep -Eo '([0-9]{1,3}/.){3}[0-9]{1,3}'
- wget -O - -q
icanhazip.com
- wget http://
ipinfo.io
/ip -qO -
- curl
ifconfig.me
-
curl ip.sb
Keep Terminal Running in background (Screen)
- Install screen (Depends on the Linux Distribution if it came pre installed or not) : yum install screen . Or in Debian based OS, such as Ubuntu: apt install screen
- Initiate a Screen : screen or screen -S <screen name> <command to execute>
- Detach from the screen : "CTRL+A,D" not "CTRL+A+D"
- List all the screen currently working : screen -ls
- Reattach to a screen : screen -r <session number> or screen -r <screen name>
- Kill specific screen: screen -X -S <screen name> quit
- Kill all screens : pkill screen
Log into Linux Using Self-Created SSH Key From Windows
- ssh-keygen -t rsa -b 4096
- type $env:USERPROFILE/.ssh/id_rsa.pub | ssh username@linux-host "mkdir -p .ssh && chmod 700 .ssh && cat >> .ssh/authorized_keys && chmod 600 .ssh/authorized_keys"
- scp C:/Users/<WindowsUser>/.ssh/id_rsa.pub username@linux-host:~/id_rsa.pub; ssh username@linux-host "mkdir -p ~/.ssh && chmod 700 ~/.ssh && cat ~/id_rsa.pub >> ~/.ssh/authorized_keys && chmod 600 ~/.ssh/authorized_keys && rm ~/id_rsa.pub
- scp C:/users/netsec/.ssh/id_ed25519.pub [email protected]:/root/.ssh/authorized_keys
Build SSH Trust Relationship Between Linux Machines
su nsm
cd /home/nsm
ssh-keygen -t rsa
scp /home/nsm/.ssh/id_
admin@<ipAddressOfOtherServer>:/home/admin/authorized_keys
- or Go to the remote server. The command below will add the key that is in temp1 file to the end of the authorized_keys file.
cat temp1 >> authorized_keys
- Repeat steps 2-6 on deviceB. On deviceB, become root: (from user nsm, exit to root). Move the authorized_keys file that was copied to admin into nsm/.ssh:
mv /home/admin/authorized_keys /home/nsm/.ssh/authorized_keys
- Change ownership of authorized_keys:
chown nsm:nsm /home/nsm/.ssh/authorized_keys
- At this point, you will be able to SSH between both servers without it asking for a password.
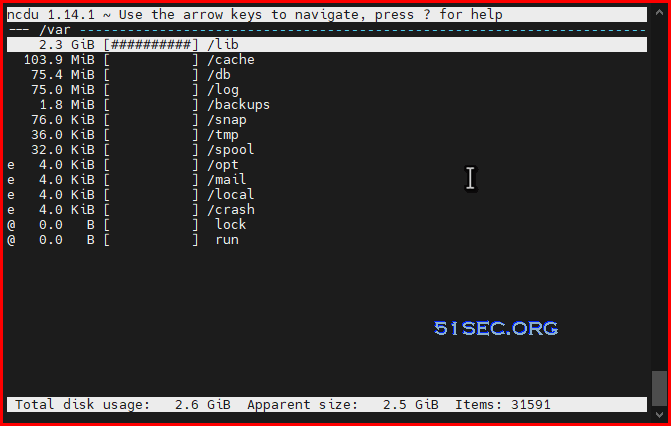
Find Large Folders
2. Check your application
- /root/etc-pihole/pihole-FTL.db
You can diminish the size of the journal by means of these commands:
sudo journalctl --vacuum-size=100M
This will retain the most recent 100M of data.
sudo journalctl --vacuum-time=10d
will delete everything but the last 10 days.
Find Big Files in Linux File System
bitnami@ip-172-26-0-136:/opt$ du -shc /opt/bitnami/apps/wordpress/htdocs/wp-content/* 1.8G /opt/bitnami/apps/wordpress/htdocs/wp-content/ai1wm-backups 24K /opt/bitnami/apps/wordpress/htdocs/wp-content/backup-migration 4.0K /opt/bitnami/apps/wordpress/htdocs/wp-content/blogs.dir 24K /opt/bitnami/apps/wordpress/htdocs/wp-content/cache 4.0K /opt/bitnami/apps/wordpress/htdocs/wp-content/index.php 6.3M /opt/bitnami/apps/wordpress/htdocs/wp-content/languages 132M /opt/bitnami/apps/wordpress/htdocs/wp-content/plugins 27M /opt/bitnami/apps/wordpress/htdocs/wp-content/themes 152K /opt/bitnami/apps/wordpress/htdocs/wp-content/updraft 4.0K /opt/bitnami/apps/wordpress/htdocs/wp-content/upgrade 512M /opt/bitnami/apps/wordpress/htdocs/wp-content/uploads 68K /opt/bitnami/apps/wordpress/htdocs/wp-content/w3tc-config 2.4G total
Find Command:
- find . -type f -size +10000 -exec ls -lh {} /;
- find . -type f -size +50000k -exec ls -lh {} /; | awk '{ print $9 ": " $5 }'
- Find large files (>10M) in current folder
find . -type f -size +10000k
a. Juniper Firewall
Sample output:
root@FW% find . -type f -size +10000 -exec ls -lh {} /;
-rw-r--r-- 1 930 929 134M Jan 5 17:34 ./cf/packages/junos-11.4R6.6-domestic
-rw-r--r-- 1 root wheel 139M Sep 8 2011 ./cf/var/log/junos-srxsme-11.2R2.4-domestic.tgz
-rw-r----- 1 root wheel 4.9M Feb 11 17:12 ./cf/var/db/idpd/db/secdb_02.db
-rw-r----- 1 root wheel 6.7M Feb 11 17:13 ./cf/var/db/idpd/db/secdb_03.db
-rw-r----- 1 root wheel 64M Feb 11 17:13 ./cf/var/db/idpd/db/secdb_06.db
-rwxr-xr-x 1 admin 20 24M May 23 08:38 ./cf/var/db/idpd/nsm-download/SignatureUpdate.xml
.....
b. Checkpoint Firewall gateway:
[Expert@CP]# find . -type f -size +50000k -exec ls -lh {} /; | awk '{ print $9 ": " $5 }'
./sysimg/CPwrapper/linux/CPEndpointSecurity/EndpointSecurityServer.bin: 145M
./sysimg/CPwrapper/linux/windows/SmartConsole.exe: 194M
./sysimg/CPwrapper/linux/CPrt/CPrt-R75.40-00.i386.rpm: 53M
./sysimg/CPwrapper/linux/CPportal/CPportal-R75.40-00.i386.rpm: 59M
./var/log/db: 336M
....
df -h //check disk usage du -sh /* | sort -nr // check each folder's usage du -sh /var/* | sort -nr //check internal folder usage inside folder /var du -h --max-depth=1 lsof | grep deleted //check if there is deleted file locked by process. cat /dev/null > filename //clear up logs rm -rf filename //clean up /var/log/journal files journalctl --vacuum-time=1w //keep one week log journalctl --vacuum-size=500M //keep only 500MB logs rm -rf /var/log/journal/f9d400c5e1e8c3a8209e990d887d4ac1 //delete /var/log/journal log files
Clean all Linux History
sudo journalctl --rotate --vacuum-size=100Mecho > /var/log/wtmp echo > /var/log/btmp echo >/var/log/lastlog echo > /var/log/secure echo > /var/log/messages echo >/var/log/syslog echo >/var/log/xferlog echo >/var/log/auth.log echo >/var/log/user.log cat /dev/null > /var/adm/sylog cat /dev/null > /var/log/maillog cat /dev/null > /var/log/openwebmail.log cat /dev/null > /var/log/mail.info echo >/var/run/utmp echo > ~/.bash_history history -c echo > .bash_history history -cw
cat /dev/null > /var/log/boot.log cat /dev/null > /var/log/btmp cat /dev/null > /var/log/cron cat /dev/null > /var/log/dmesg cat /dev/null > /var/log/dracut.log cat /dev/null > /var/log/lastlog cat /dev/null > /var/log/maillog cat /dev/null > /var/log/messages cat /dev/null > /var/log/secure cat /dev/null > /var/log/spooler cat /dev/null > /var/log/tallylog cat /dev/null > /var/log/wtmp cat /dev/null > /var/log/yum.log
For CentOS 7:
cat /dev/null > /var/log/boot.log cat /dev/null > /var/log/btmp cat /dev/null > /var/log/cron cat /dev/null > /var/log/dmesg cat /dev/null > /var/log/firewalld cat /dev/null > /var/log/grubby cat /dev/null > /var/log/lastlog cat /dev/null > /var/log/mail.info cat /dev/null > /var/log/maillog cat /dev/null > /var/log/messages cat /dev/null > /var/log/secure cat /dev/null > /var/log/spooler cat /dev/null > /var/log/syslog cat /dev/null > /var/log/tallylog cat /dev/null > /var/log/wpa_supplicant.log cat /dev/null > /var/log/wtmp cat /dev/null > /var/log/yum.log
Use ssh key to encrypt / decrypt files
echo ‘This is a sekret’ >/tmp/msg.txt
Export public key:
openssl rsa -in ~/private.pem -out /tmp/
-outform PEM -pubout
Encrypt file with public key (anyone can have this key):
openssl rsautl -encrypt -inkey /tmp/
-pubin -in /tmp/msg.txt -out /tmp/file.enc
Decrypt the file with private key (only you should have the private key):
openssl rsautl -decrypt -inkey ~/private.pem -in /tmp/file.enc -out /tmp/decrypted.txt
Check decoded message:
cat /tmp/decrypted.txt
AWS Amazon Linux Instance Commands
sudo yum update -y
sudo yum install -y httpd24 php70 mysql56-server php70-mysqlnd
sudo service httpd star
sudo chkconfig httpd on
chkconfig --list httpd
curl http://localhost
sudo usermod -a -G apache ec2-user
groups
sudo chown -R ec2-user:apache /var/www
sudo chmod 2775 /var/www
find /var/www -type d -exec sudo chmod 2775 {} /;
find /var/www -type f -exec sudo chmod 0664 {} /;
echo "<?php phpinfo(); ?>" > /var/www/html/phpinfo.php
sudo yum list installed httpd24 php70 mysql56-server php70-mysqlnd
sudo service mysqld start
sudo chkconfig mysqld on
sudo service httpd restart
Validate UDP ports reachability
Ensure, that your ports are reachable through your external IP.
To validate UDP connection the simplest way, run this on your server:
nc -ul 52101And this on your local client:
nc -u [server ip] 52101Then try to type on one end, you should see characters on the other side.
If it does not work for you, then most likely your port forwarding is not working correctly. Or your ISP is blocking traffic.
If you get Command 'nc' not found. error, you can install netcat package using:
sudo apt-get install netcatCheck Logs
- journalctl -u cloudflared -f
tail -f /tmp/myapp.log /var/log/postgresql/postgresql.main.log <(journalctl -f)- journalctl -xe
共有 0 条评论