
Raspberry Pi 2 Model B Basic Configuration Part 2 – Install All Kinds of Services and Self Hosted Applications
This is the second post regarding basic configuration of Raspberry Pi 2.
Enter emergency mode - single user
-
On the SD card’s boot partition (usually mounted as "boot"), open the file named
cmdline.txt. -
This file contains a single long line of boot parameters. Append the following to the end of that line:
textinit=/bin/bashMake sure it remains a single line (no line breaks).

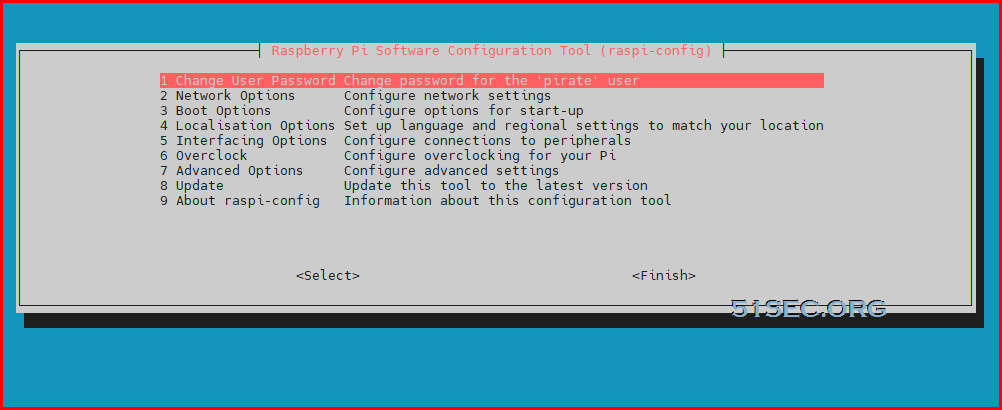
Enable Chinese Support
- Open the configuration menu:
- Navigate to Localisation Options -> Change Locale.
- The default is often
en_GB.UTF-8oren_US.UTF-8, which you should keep selected. - Additionally, you need to enable Chinese locales like
zh_CN.UTF-8orzh_TW.UTF-8in the list by pressing the spacebar to put an asterisk next to them. - Select the desired default locale for the system (e.g., you can keep
en_US.UTF-8for English interface but with Chinese support).
filebrowser
root@pi:/mnt/usb1/data/filebrowser# docker run / > -v /mnt/usb1/data/Pictures:/srv / > -v /mnt/usb1/data/filebrowser/database:/database / > -v /mnt/usb1/data/filebrowser/config:/config / > -p 8080:80 / > filebrowser/filebrowser:v2 Unable to find image 'filebrowser/filebrowser:v2' locally v2: Pulling from filebrowser/filebrowser 13bd764ce982: Pull complete 04e597873be7: Pull complete 6dd2d44f53b6: Pull complete 5591e4afb5a4: Pull complete 2c2fdf33b70f: Pull complete b30f7a70e9e0: Pull complete 94f8d7225adc: Pull complete c602ce85ea36: Pull complete 1720e397c4b5: Pull complete 7f4bc9a25659: Pull complete 50a5af5c518f: Pull complete b77a310b51bd: Pull complete Digest: sha256:c751c3a0ed38a8a18b647ae7897b57c793f52a6501a75be2fe4b72d1c27b60ea Status: Downloaded newer image for filebrowser/filebrowser:v2 2025/11/01 23:13:08 Warning: filebrowser.db can't be found. Initialing in /database/ 2025/11/01 23:13:08 Using database: /database/filebrowser.db 2025/11/01 23:13:08 Using config file: /config/settings.json 2025/11/01 23:13:08 Performing quick setup 2025/11/01 23:13:08 User 'admin' initialized with randomly generated password: OVQhKcXoSOMv-Dla 2025/11/01 23:13:09 Listening on [::]:80 2025/11/01 23:16:09 /api/users/1: 400 192.168.2.248 password is too short, minimum length is 12 2025/11/01 23:16:42 /api/users/1: 400 192.168.2.248 password is too short, minimum length is 12

Home-gallery
root@pi:/mnt/usb1/data# gallery run init --source /data/Pictures
[2025-11-01 16:21:19.881]: cli.config.init Initialized configuration '/data/config/gallery.config.yml' from /app/gallery.config-example.yml
root@pi:/mnt/usb1/data# docker ps
CONTAINER ID IMAGE COMMAND CREATED STATUS PORTS NAMES
root@pi:/mnt/usb1/data# docker ps -all
CONTAINER ID IMAGE COMMAND CREATED STATUS PORTS NAMES
root@pi:/mnt/usb1/data# gallery run server
[2025-11-01 16:22:02.680]: cli.run Starting server
[2025-11-01 16:22:02.776]: cli.spawn Run cli with server
[2025-11-01 16:22:02.875]: cli.run Have a good day...
[2025-11-01 16:22:09.966]: server Your own Home Gallery is running at http://localhost:3000
[2025-11-01 16:22:09.976]: server.cli Run cli with run import --initial --update --watch...
[2025-11-01 16:22:10.070]: server.api.database.read Database file /data/config/database.db does not exists. Waiting for the database file...
[2025-11-01 16:22:13.995]: cli.run Import online sources: /data/Pictures
[2025-11-01 16:22:14.001]: cli.task.import Run import in watch mode. Start watching source dirs for file changes: /data/Pictures
[2025-11-01 16:22:22.103]: cli.task.import Run incremental import in batch mode of different file sizes
[2025-11-01 16:22:22.104]: cli.task.import Run batch import: Import files up to 20 MB
[2025-11-01 16:22:22.107]: cli.task.import Import files from source dirs: /data/Pictures
[2025-11-01 16:22:22.124]: cli.spawn Run cli with index --directory /data/Pictures --index /data/config/Pictures.idx --exclude-if-present .galleryignore --max-filesize 20M --add-limits 10,20,1.2,200 --journal 1101-BngF
[2025-11-01 16:22:25.835]: index Updating file index for directory /data/Pictures
[2025-11-01 16:22:25.945]: index.filter.maxFilesize Limit files up to 20M (20971520 bytes)
[2025-11-01 16:22:25.949]: index.filter.limit Index has 0 entries. Set index limit to max 10 new entries
[2025-11-01 16:22:25.994]: index.filter.limit Index limit of 10 exceeded. No more new files are added to the file index.
[2025-11-01 16:22:25.998]: index.create Read 10 files in /data/Pictures 47ms
[2025-11-01 16:22:26.002]: index.update Initiate index with 10 entries
[2025-11-01 16:22:26.064]: index.checksum Calculating ids for 7 entries with 5.3MB of total size 5.3MB (100.0%)
[2025-11-01 16:22:26.528]: index.checksum All ids of 5.3MB are calculated. Calculated ids of 5.3MB (100.0%) 465ms
[2025-11-01 16:22:26.548]: index File index was saved to /data/config/Pictures.idx and 7 entries have new checkums/ids 18ms
[2025-11-01 16:22:26.577]: index.journal Journal /data/config/Pictures.idx.1101-BngF.journal created
[2025-11-01 16:22:26.578]: index Updated file index for directory /data/Pictures 744ms
[2025-11-01 16:22:26.668]: cli.spawn Run cli with extract --index /data/config/Pictures.idx --journal 1101-BngF
[2025-11-01 16:22:37.608]: index.readStream Reading file index journal /data/config/Pictures.idx.1101-BngF.journal
[2025-11-01 16:22:39.605]: extractor.image.resize warn Could not load sharp image resizer
[2025-11-01 16:22:39.933]: extractor.image.resize Use vipthumbnail fallback to resize images
[2025-11-01 16:22:39.962]: extractor.image.heic warn Could not load sharp to write JPG
[2025-11-01 16:22:39.969]: extractor.image.heic warn Use slower jpeg-js to write JPG
[2025-11-01 16:22:39.991]: extractor.apiEntry warn You are using the public api server https://api.home-gallery.org. Please read its documentation at https://docs.home-gallery.org for privacy concerns
[2025-11-01 16:22:47.842]: extractor.image.preview Created 5 image previews from 1da393f:Pictures:HomePictures/2010/oaccac/IMG00009-20100210-1416.jpg with sizes of 1920,1280,800,320,128 3.7s
[2025-11-01 16:22:52.211]: extractor.image.preview Created 5 image previews from eada6cc:Pictures:HomePictures/2010/oaccac/IMG00010-20100210-1416.jpg with sizes of 1920,1280,800,320,128 4.3s
[2025-11-01 16:22:52.489]: extractor Processed 1 entries (#1, +1, processing 6 and queued 0 entries) 12.5s
[2025-11-01 16:22:54.888]: extractor.image.preview Created 4 image previews from 22cba0f:Pictures:HomePictures/2010/oaccac/IMG00012-20100210-1417.jpg with sizes of 1280,800,320,128 2.67s
[2025-11-01 16:22:58.818]: extractor.image.preview Created 5 image previews from 1f0fd2c:Pictures:HomePictures/2010/oaccac/IMG_0013.jpg with sizes of 1920,1280,800,320,128 3.9s
[2025-11-01 16:23:02.655]: extractor.image.preview Created 5 image previews from a6ebd5b:Pictures:HomePictures/2010/oaccac/IMG_0022.jpg with sizes of 1920,1280,800,320,128 3.8s
[2025-11-01 16:23:05.173]: extractor Processed 5 entries (#5, +4, processing 2 and queued 0 entries) 12.7s
[2025-11-01 16:23:07.363]: extractor.image.preview Created 5 image previews from c2a94fa:Pictures:HomePictures/2010/oaccac/IMG_0034.jpg with sizes of 1920,1280,800,320,128 4.7s
[2025-11-01 16:23:11.555]: extractor.image.preview Created 5 image previews from 53c58d4:Pictures:HomePictures/2010/oaccac/talking.JPG with sizes of 1920,1280,800,320,128 4.2s
[2025-11-01 16:23:14.094]: cli.extract Extract all meta data and calculated all preview files from 7 entries 37s
[2025-11-01 16:23:14.163]: cli.spawn Run cli with database create --index /data/config/Pictures.idx --journal 1101-BngF
[2025-11-01 16:23:19.045]: index.readStream Reading file index journal /data/config/Pictures.idx.1101-BngF.journal
[2025-11-01 16:23:19.344]: database.build Created 7 database entries 377ms
[2025-11-01 16:23:19.376]: database.mergeJournal Read file index journal /data/config/Pictures.idx.1101-BngF.journal
[2025-11-01 16:23:19.403]: database.mergeJournal Initialize non existing database file /data/config/database.db
[2025-11-01 16:23:19.418]: database.mergeJournal Merged 7 new and 0 removed entries from journals to 7 entries (+7) to the database 14ms
[2025-11-01 16:23:19.451]: database.mergeJournal Wrote database with 7 entries to /data/config/database.db 31ms
[2025-11-01 16:23:19.453]: cli.database Created database with 7 entries 0.92s
https://docs.home-gallery.org/install/index.html
https://docs.home-gallery.org/install/index.html#docker
stop the gallery docker then re-run
- docker ps
- docker stop <container name>
- gallery run import
- gallery run server
- gallery -h
Mount External Hard Drive
Step 1. Check the External Hard Drive
root@pi:/home/pi2b# blkid /dev/mmcblk0p2: LABEL="rootfs" UUID="37163896-0cfe-4a2e-aff1-80a0b8adcdde" BLOCK_SIZE="4096" TYPE="ext4" PARTUUID="3def1391-02" /dev/mmcblk0p1: LABEL_FATBOOT="bootfs" LABEL="bootfs" UUID="62AF-2DF5" BLOCK_SIZE="512" TYPE="vfat" PARTUUID="3def1391-01" /dev/sda1: LABEL="1T" BLOCK_SIZE="512" UUID="680615E70615B752" TYPE="ntfs" PARTUUID="df4082ca-01" root@pi:/home/pi2b#
ls -l /dev/disk/by-uuid.root@pi:~# ls -l /dev/disk/by-uuid total 0 lrwxrwxrwx 1 root root 15 Nov 1 23:34 37163896-0cfe-4a2e-aff1-80a0b8adcdde -> ../../mmcblk0p2 lrwxrwxrwx 1 root root 10 Nov 2 11:18 432f2c49-5a45-42ca-9138-6b576c7c5ddd -> ../../sda1 lrwxrwxrwx 1 root root 15 Nov 1 23:34 62AF-2DF5 -> ../../mmcblk0p1
Step 2. Check the Partitions
We now need to check the boot name of our 1T Hard Drive’s partition.
Care: the fdisk command can do many things, including wiping your drive/partitions. Follow the steps carefully.
sudo fdisk –l
Disk /dev/mmcblk0: 7.42 GiB, 7969177600 bytes, 15564800 sectors Units: sectors of 1 * 512 = 512 bytes Sector size (logical/physical): 512 bytes / 512 bytes I/O size (minimum/optimal): 512 bytes / 512 bytes Disklabel type: dos Disk identifier: 0x3def1391 Device Boot Start End Sectors Size Id Type /dev/mmcblk0p1 16384 1064959 1048576 512M c W95 FAT32 (LBA) /dev/mmcblk0p2 1064960 15564799 14499840 6.9G 83 Linux Disk /dev/sda: 931.51 GiB, 1000204885504 bytes, 1953525167 sectors Disk model: GoFlex DVR Units: sectors of 1 * 512 = 512 bytes Sector size (logical/physical): 512 bytes / 512 bytes I/O size (minimum/optimal): 512 bytes / 512 bytes Disklabel type: dos Disk identifier: 0xdf4082ca Device Boot Start End Sectors Size Id Type /dev/sda1 63 1953520127 1953520065 931.5G 7 HPFS/NTFS/exFAT root@pi:/home/pi2b#
Step 3. Mounting it.
Now we know where our drive is, we need to mount it.
Before we mount it, lets use systemctl daemon-reload command to reload fstab.
sudo systemctl daemon-reload
sudo mount /dev/sda1 /mnt
The folder “/mnt” is the standard location for mounting permanent media, but you can always create your own folder if required using the “mkdir” command.
That’s it! Our drive is mounted. If there is any error, use "dmesg | tail " command to check issue.
use ntfsfix /dev/sda1 command to repair.
Step 4. Permissions.
As our drive is formatted in NTFS, we might need to change the /mnt drive permissions in order to enable proper access. Simply run the following command:
sudo chmod 775 /mnt
This will change your permissions and allow you to access the drive.
To test this, let’s try to create a folder. . .
cd /mnt
sudo mkdir IMGFOLDER
cd IMGFOLDER
Step 5. Auto Mounting it after reboot
root@pi:~#nano /etc/fstab
To mount with these options automatically at boot, add a line like this to /etc/fstab:
text(Example)/dev/sdXN /mnt/ntfs ntfs-3g defaults,noatime,async,big_writes 0 0
-
Mount options like
noatime,async, andbig_writescan help improve NTFS performance on Linux when using ntfs-3g.
-
noatimedisables updating the access time on files, reducing write overhead. -
asyncallows asynchronous I/O which improves performance by not waiting for write operations to complete synchronously. -
big_writesenables larger write requests, improving write speed on NTFS.
Example fstab line with performance options
textUUID=432f2c49-5a45-42ca-9138-6b576c7c5ddd /mnt/usb1 ext4 defaults,noatime,nodiratime,data=writeback,commit=60 0 2
Important notes:
-
Some options like
barrier=0may not be supported on all devices and can risk data loss on power failure. -
data=writebacksacrifices some data integrity guarantees, so use it only if performance is critical and you have reliable power. -
If your USB disk supports write caching at hardware level (check via
hdparm), combining that with these options can further boost performance. -
Always test and periodically check disk health when using aggressive performance flags.
NFS Server
nano /etc/exports
add following line for everyone to read and write to it
/mnt/usb1/data *(rw,all_squash,insecure,async,no_subtree_check,anonuid=1000,anongid=1000)
We can restart this service by using the following command in the terminal.
systemctl restart nfs-kernel-server
We need this IP address so that we can successfully connect to the Raspberry Pi NFS server.
To enable NFS only support version 4
- Open or create the file
/etc/nfs.conf.d/nfsv3-disable.confusing a text editor with root privileges (e.g.,sudo nano /etc/nfs.conf.d/nfsv3-disable.conf). - Add the following lines to disable NFS version 3 (NFSv2 is usually disabled by default on modern systems):
You can check the available versions before and after the change using
cat /proc/fs/nfsd/versions. A plus sign (+) indicates an available version, while a minus sign (-) indicates a disabled one. - Check nfs support version:
Docker
apt install docker.io
HetrixTools Agent

root@pi:~# wget -qO- https://raw.githubusercontent.com/hetrixtools/agent/master/hetrixtools_install.sh | sudo bash -s c8sf345688563453453acg9d84cf7 1 ssh 0 0 0 0
Checking root privileges...
... done.
Installing from master branch...
Checking Server ID (SID)...
... done.
Checking system utilities...
... done.
Checking if there's any old hetrixtools agent already installed...
No old hetrixtools agent found...
... done.
Creating the hetrixtools agent folder...
... done.
Fetching the agent...
... done.
Fetching the config file...
... done.
Inserting Server ID (SID) into agent config...
... done.
Checking if any services should be monitored...
Services found, inserting them into the agent config...
... done.
Checking if software RAID should be monitored...
... done.
Checking if Drive Health should be monitored...
... done.
Checking if 'View running processes' should be enabled...
... done.
Checking if any ports to monitor number of connections on...
... done.
Making sure no hetrixtools agent scripts are currently running...
kill: (10894): No such process
... done.
Checking if hetrixtools user already exists...
The hetrixtools user doesn't exist, creating it now...
Assigning permissions for the hetrixtools user...
... done.
Removing any old hetrixtools cronjob, if exists...
... done.
Setting up systemd timer...
... done.
Cleaning up the installation file...
... done.
Letting HetrixTools platform know the installation has been completed...
... done.
Starting the agent under the 'root' user...
... done.
HetrixTools agent installation completed.
root@pi:~#
Cloudfalred

- Update your package list and install
cloudflared:
- Verify the installation by checking the version:
root@pi:~# sudo cloudflared service install eyJhIjoiNDIwOTFiYzM3NjVjYmYyNDM2ZTMiLCJ0IjoAiMTgwODNjNmMtZjcyYS00NjdlLWI1NDgtFaUzAwWmpNMUxUZzVaVGd0TVdRek0yUmhOV1ZrTXpBMyJ9 2025-10-19T00:05:07Z INF Using Systemd 2025-10-19T00:05:16Z INF Linux service for cloudflared installed successfully root@pi:~#
speedtest
apt install speedtest-cli
Timezone change
|
pi@raspberrypi ~ $ date
Tue Oct 6 13:48:38 UTC 2015 pi@raspberrypi ~ $ tzselect Please identify a location so that time zone rules can be set correctly. Please select a continent or ocean. 1) Africa 2) Americas 3) Antarctica 4) Arctic Ocean 5) Asia 6) Atlantic Ocean 7) Australia 8) Europe 9) Indian Ocean 10) Pacific Ocean 11) none - I want to specify the time zone using the Posix TZ format pi@raspberrypi ~ $ tzconfig pi@raspberrypi ~ $ date |
Access the Raspberry Pi Desktop
XRDP service will allow you to use remote desktop to access Raspberry Pi GUI through VNC service.
|
pi@raspberrypi ~ $ sudo apt-get install xrdp
Reading package lists... Done Building dependency tree Reading state information... Done The following extra packages will be installed: tightvncserver xfonts-base Suggested packages: tightvnc-java The following NEW packages will be installed: tightvncserver xfonts-base xrdp 0 upgraded, 3 newly installed, 0 to remove and 0 not upgraded. Need to get 7,219 kB of archives. After this operation, 11.5 MB of additional disk space will be used. Do you want to continue [Y/n]? y Get:1 http://mirrordirector.raspbian.org/raspbian/ wheezy/main tightvncserver armhf 1.3.9-6.4 [786 kB] Get:2 http://mirrordirector.raspbian.org/raspbian/ wheezy/main xfonts-base all 1:1.0.3 [6,181 kB] Get:3 http://mirrordirector.raspbian.org/raspbian/ wheezy/main xrdp armhf 0.5.0-2 [252 kB] Fetched 7,219 kB in 14s (493 kB/s) Selecting previously unselected package tightvncserver. (Reading database ... 76938 files and directories currently installed.) Unpacking tightvncserver (from .../tightvncserver_1.3.9-6.4_armhf.deb) ... Selecting previously unselected package xfonts-base. Unpacking xfonts-base (from .../xfonts-base_1%3a1.0.3_all.deb) ... Selecting previously unselected package xrdp. Unpacking xrdp (from .../xrdp_0.5.0-2_armhf.deb) ... Processing triggers for man-db ... Processing triggers for fontconfig ... Setting up tightvncserver (1.3.9-6.4) ... update-alternatives: using /usr/bin/tightvncserver to provide /usr/bin/vncserver (vncserver) in auto mode update-alternatives: using /usr/bin/Xtightvnc to provide /usr/bin/Xvnc (Xvnc) in auto mode update-alternatives: using /usr/bin/tightvncpasswd to provide /usr/bin/vncpasswd (vncpasswd) in auto mode Setting up xfonts-base (1:1.0.3) ... Setting up xrdp (0.5.0-2) ... [....] Generating xrdp RSA keys...... Generating 512 bit rsa key... ssl_gen_key_xrdp1 ok saving to /etc/xrdp/rsakeys.ini done (done). |


List System Information
HypriotOS/armv7: pirate@black-pearl in ~ $ ls /etc/*release /etc/os-release HypriotOS/armv7: pirate@black-pearl in ~ $ cat /etc/os-release PRETTY_NAME="Raspbian GNU/Linux 10 (buster)" NAME="Raspbian GNU/Linux" VERSION_ID="10" VERSION="10 (buster)" VERSION_CODENAME=buster ID=raspbian ID_LIKE=debian HOME_URL="http://www.raspbian.org/" SUPPORT_URL="http://www.raspbian.org/RaspbianForums" BUG_REPORT_URL="http://www.raspbian.org/RaspbianBugs" HypriotOS/armv7: pirate@black-pearl in ~ $
Add Cron Job
|
pi@raspberrypi ~ $ crontab -e
GNU nano 2.2.6 File: /tmp/crontab.obWc51/crontab # Edit this file to introduce tasks to be run by cron. [ Wrote 24 lines ] crontab: installing new crontab |
Install Portainer
Assume you have installed HypriotOS from https://blog.hypriot.com/downloads/
Docker and Docker-Compose has been installed. The default credentials for the image are user pirate with password hypriot.
HypriotOS/armv7: root@black-pearl in ~ # docker version Client: Docker Engine - Community Version: 19.03.12 API version: 1.40 Go version: go1.13.10 Git commit: 48a6621 Built: Mon Jun 22 15:53:41 2020 OS/Arch: linux/arm Experimental: false Server: Docker Engine - Community Engine: Version: 19.03.12 API version: 1.40 (minimum version 1.12) Go version: go1.13.10 Git commit: 48a6621 Built: Mon Jun 22 15:47:34 2020 OS/Arch: linux/arm Experimental: false containerd: Version: 1.2.13 GitCommit: 7ad184331fa3e55e52b890ea95e65ba581ae3429 runc: Version: 1.0.0-rc10 GitCommit: dc9208a3303feef5b3839f4323d9beb36df0a9dd docker-init: Version: 0.18.0 GitCommit: fec3683 HypriotOS/armv7: root@black-pearl in ~ # docker-compose version docker-compose version 1.26.1, build 634eb50 docker-py version: 4.2.2 CPython version: 3.7.3 OpenSSL version: OpenSSL 1.1.1d 10 Sep 2019 HypriotOS/armv7: root@black-pearl in ~ #
HypriotOS/armv7: root@black-pearl in ~ # docker volume create portainer_data portainer_data HypriotOS/armv7: root@black-pearl in ~ # docker run -d -p 9000:9000 --name portainer --restart always -v /var/run/docker.sock:/var/run/docker.sock -v portainer_data:/data portainer/portainer-ce:latest Unable to find image 'portainer/portainer-ce:latest' locally latest: Pulling from portainer/portainer-ce 651a8e6e1630: Pull complete 56e38df73332: Pull complete c559aeebeb38: Pull complete Digest: sha256:79edf1302c9b4fdb06bc23321cc551e9118c29e6d668e12e23d4e58d993ab830 Status: Downloaded newer image for portainer/portainer-ce:latest 7434238c52b5c1a94d3cce7903c005ac7efe07ff3c250201ae7ccb683be4ee37 HypriotOS/armv7: root@black-pearl in ~ #
Install Hypriot OS on Raspberry Pi
Install Pi-hole
- Copy docker-compose.yml.example to docker-compose.yml and update as needed. See example below: Docker-compose example:
version: "3" # More info at https://github.com/pi-hole/docker-pi-hole/ and https://docs.pi-hole.net/ services: pihole: container_name: pihole image: pihole/pihole:latest ports: - "53:53/tcp" - "53:53/udp" - "67:67/udp" - "80:80/tcp" environment: TZ: 'America/Toronto' WEBPASSWORD: 'Change-it-to-your-own' # We'll use host networking simply because it is way easier to setup. network_mode: host # Volumes store your data between container upgrades volumes: - './etc-pihole/:/etc/pihole/' - './etc-dnsmasq.d/:/etc/dnsmasq.d/' # Recommended but not required (DHCP needs NET_ADMIN) # https://github.com/pi-hole/docker-pi-hole#note-on-capabilities cap_add: - NET_ADMIN restart: unless-stopped
- Run
docker-compose up --detachto build and start pi-hole
References
版权声明:
作者:zhangchen
链接:https://www.techfm.club/p/226064.html
来源:TechFM
文章版权归作者所有,未经允许请勿转载。
共有 0 条评论