
Step by Step Deploy Guacamole with MySQL DB (Native Installation from Command Line)
This Post records the steps to install Guacamole into Ubuntu 24.04 and other versions.
Here are some other Related Posts, which include docker deployment:
- Using Portainer to Deploy Guacamole As Web Based Remote Access Gateway (Updated) & KASM Installation
- Using Portainer and Docker to Deploy Guacamole Clientless Remote Desktop Gateway
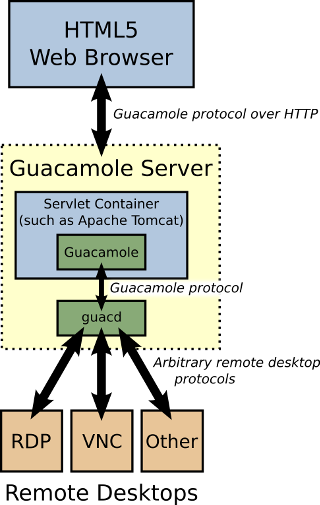
Guacamole Architecture

Guacamole is made up of two parts;
guacamole-server, which provides the guacd proxy and all the native, server-side components required by Guacamole to connect to remote desktops.guacamole-clientwhich provides the client to be served by the servlet container which is usuallyTomcat.
Guacamole Release
- Guacamole version releases:
-
1.6.02025-06-22
Improved rendering performance, improved Docker support, configurable case sensitivity, batch connection import, support Duo v4.
-
Archived Releases
-
1.5.52024-04-05
Bugfix release addressing bugs and regressions from 1.5.4 and earlier, including a resource leak affecting RDP and SSH connections, and updating dependencies to their latest compatible versions.
-
1.5.42023-12-07
Bugfix release addressing miscellaneous issues from 1.5.3 and earlier, and updating dependencies to their latest compatible versions.
-
1.5.32023-07-31
Bugfix release addressing miscellaneous issues from 1.5.2 and earlier, and updating dependencies to their latest compatible versions.
-
1.5.22023-05-25
Bugfix release addressing issues with the Docker images, web application UI, systems in FIPS mode, and miscellaneous others.
-
1.5.12023-04-13
Bugfix release addressing regressions in 1.5.0, particularly issues with the Docker images.
-
1.5.02023-02-18
In-app playback of recordings, key vaults, ECC keys, multiple LDAP/AD servers, shared connection join/leave notifications, bug fixes.
-
1.4.02022-01-01
Connection tiling, keyboard broadcasting, SSO improvements, multi-touch support for RDP, fixes for RDP audio input, JSON authentication, bug fixes.
-
1.3.02021-01-01
Automatic prompting for remote desktop credentials, user group support for CAS and OpenID, bug fixes.
-
1.2.02020-06-28
Support for SAML 2.0, Wake-on-LAN, and easy switching between active connections, numerous fixes for RDP, improvements to TOTP, database support, and behavior on iOS devices.
-
1.1.02020-01-29
Dynamic image quality, support for Kubernetes, migration to FreeRDP 2.0.0 and Apache Directory API, fixes and improvements to Docker images, terminal behavior, and user groups.
-
1.0.02019-01-08
User groups, improved clipboard integration, TOTP (Google Authenticator), RADIUS, dead keys.
https://guacamole.apache.org/releases/
Installation Instruction
- https://guacamole.apache.org/doc/gug/installing-guacamole.html
- Installing Guacamole natively
-
This involves installing a servlet container like Apache Tomcat, deploying the Guacamole web application beneath Tomcat, and building at least guacamole-server from source.
- Installing Guacamole using Docker containers
-
This involves running a pair of Docker containers using the provided
guacamole/guacamoleandguacamole/guacdDocker images.
For some configuration changes, Guacamole will only reread its configuration and load newly-installed extensions during startup, so Tomcat will need to be restarted before these changes can take effect. Restart Tomcat and give the new functionality a try. You do not need to restart guacd.
System preparation - Pre-installation
Ubuntu Related Posts:
1. Install Ubuntu into VMware Workstation.
- apt update -y && apt upgrade -y
- about 479GB space needed
- apt full-upgrade -y
- Most likely, you will get 0 need to be ugpraded if you already ran apt upgrade.
- reboot
apt upgrade will upgrade all packages that can be upgraded without the need to install additional packages or remove any conflicting installed packages. Basically it will apply all package upgrades that do not include changed dependencies.
apt full-upgrade (the correct equivalent for apt-get dist-upgrade) applies package upgrades as well if they require either the install of new packages or the removal of conflicting installed packages. Basically it will apply all package upgrades including those with changed dependencies.
On stable distro suites, when not adding new APT sources, one will face changed dependencies rarely, hence usually apt full-upgrade is not required or does not apply any additional upgrades compared to apt upgrade, except for Linux image package upgrades. Linux image packages are usually shipped as meta packages, e.g. linux-image-amd64, which then depends on the actual versioned package, e.g. linux-image-4.19.0-9-amd64. When one uses apt upgrade, the Linux image meta package will usually not be upgraded, since it would required to install a new versioned Linux image package. Running apt full-upgrade on the other hand will do the upgrade, furthermore it might remove the old versioned package, if the new one has a related conflict defined (which is usually not the case for Linux image packages, just as example!).
2. Install Required Dependencies
libpng-dev libtool-bin libossp-uuid-dev libvncserver-dev /
freerdp2-dev libssh2-1-dev libtelnet-dev libwebsockets-dev /
libpulse-dev libvorbis-dev libwebp-dev libssl-dev /
libpango1.0-dev libswscale-dev libavcodec-dev libavutil-dev /
libavformat-dev
root@ubuntu1:~# apt-cache policy guacd guacd: Installed: (none) Candidate: 1.3.0-1.3ubuntu1 Version table: 1.3.0-1.3ubuntu1 500 500 http://ca.archive.ubuntu.com/ubuntu noble/universe amd64 Packages root@ubuntu1:~#
Native Installing Guacamole Steps
1 Get Guacamole server 1.6.0
Notes: other version might be not compatible with Ubuntu 24.04. Test the steps before use this version.
wget https://downloads.apache.org/guacamole/1.6.0/source/guacamole-server-1.6.0.tar.gz
1.6.0 is about 1.2MB.
sudo wget https://downloads.apache.org/guacamole/1.6.0/source/guacamole-server-1.6.0.tar.gz
sudo tar -xvf guacamole-server-1.6.0.tar.gz
sudo cd guacamole-server-1.6.0
Old version using 1.5.4 might not work with Ubuntu24.0.4. File size is about 1.1MB.
2 Config and Install
sudo ./configure --with-systemd-dir=/usr/local/lib/systemd/system
sudo make
sudo make install
3 Wait build and installation process done, then update the installed library cache with the command below:
sudo ldconfig
4 At this point, everything is installed, but guacd is not running. You will need to run guacd in order to use Guacamole once the client components are installed as well.
Beware that even after installing guacd and its startup script, you will likely still have to activate the service for it to start automatically. Doing this varies by distribution, but each distribution will have documentation describing how to do so.
5 Running Guacamole-Server
root@ubuntu1:~# systemctl enable --now guacd
Synchronizing state of guacd.service with SysV service script with /usr/lib/systemd/systemd-sysv-install.
Executing: /usr/lib/systemd/systemd-sysv-install enable guacd
Created symlink /etc/systemd/system/multi-user.target.wants/guacd.service → /usr/local/lib/systemd/system/guacd.service.
root@ubuntu1:~# systemctl status guacd
● guacd.service - Guacamole Server
Loaded: loaded (/usr/local/lib/systemd/system/guacd.service; enabled; preset: enabled)
Active: active (running) since Sun 2025-08-17 23:48:24 UTC; 6s ago
Docs: man:guacd(8)
Main PID: 37723 (guacd)
Tasks: 1 (limit: 4548)
Memory: 10.0M (peak: 10.1M)
CPU: 60ms
CGroup: /system.slice/guacd.service
└─37723 /usr/local/sbin/guacd -f
Aug 17 23:48:24 ubuntu1 systemd[1]: Started guacd.service - Guacamole Server.
Aug 17 23:48:25 ubuntu1 guacd[37723]: Guacamole proxy daemon (guacd) version 1.6.0 started
Aug 17 23:48:25 ubuntu1 guacd[37723]: guacd[37723]: INFO: Guacamole proxy daemon (guacd) version 1.6.0 started
Aug 17 23:48:25 ubuntu1 guacd[37723]: guacd[37723]: INFO: Listening on host 127.0.0.1, port 4822
Aug 17 23:48:25 ubuntu1 guacd[37723]: Listening on host 127.0.0.1, port 4822
root@ubuntu1:~#
Install Tomcat Servlet
Apache Tomcat is used to serve guacamole client content to users that connects to guacamole server via the web browser. To install Tomcat, run the command below;
Guacamole client, as of this writing is not compatible with latest releases of Apache Tomcat and hence, still requires Apache Tomcat9.
apt install tomcat9 tomcat9-admin tomcat9-common tomcat9-user -y
root@ubuntu1:~# apt install tomcat9 tomcat9-admin tomcat9-common tomcat9-user -y Reading package lists... Done Building dependency tree... Done Reading state information... Done Package tomcat9 is not available, but is referred to by another package. This may mean that the package is missing, has been obsoleted, or is only available from another source E: Package 'tomcat9' has no installation candidate E: Unable to locate package tomcat9-admin E: Unable to locate package tomcat9-common E: Unable to locate package tomcat9-user root@ubuntu1:~#
echo 'deb http://ke.archive.ubuntu.com/ubuntu/ jammy-updates universe' > /etc/apt/sources.list.d/tomcat9.listRun system update;
apt updateapt install tomcat9 tomcat9-admin tomcat9-common tomcat9-user -y
Disable Ubuntu 22.04 Jammy updates universe repos and run system package cache update;
sed -i 's/^/#/' /etc/apt/sources.list.d/tomcat9.listapt updateTomcat9 is started and enabled to run on system boot upon installation.
systemctl status tomcat9If UFW is running, allow Tomcat through it.
ufw allow 8080/tcpInstall Guacamole-client
In guacamole-client contains all Java and JavaScript components of Guacamole (guacamole, guacamole-common, guacamole-ext, and guacamole-common-js). These components ultimately make up the web application that will serve the HTML5 Guacamole client to users that connect to your server. This web application will then connect to guacd, part of guacamole-server, on behalf of connected users in order to serve them any remote desktop they are authorized to access.
guacamole-client contains provides web application that will serve the HTML5 Guacamole client to users that connect to your server. The web application will then connect to guacd on behalf of connected users in order to serve them any remote desktop they are authorized to access.
Create Guacamole configuration directory;
mkdir /etc/guacamoleDownload Guacamole-client Binary
Guacamole client can be installed from a source code or from ready binary. Binary installation is used in this demo. Download Guacamole-client from Guacamole releases page for the respective latest version (v1.5.5 as of this writing) and store it in the configuration directory created above;
VER=1.6.0wget https://downloads.apache.org/guacamole/${VER}/binary/guacamole-${VER}.war -O /etc/guacamole/guacamole.warIt is about 15MB downloading.
Create a symbolic link of the guacamole client to Tomcat webapps directory as shown below;
ln -s /etc/guacamole/guacamole.war /var/lib/tomcat9/webapps/Restart Tomcat to deploy the new web application;
systemctl restart tomcat9Restart guacd daemon as well;
systemctl restart guacd● guacd.service - Guacamole Server
Loaded: loaded (/usr/local/lib/systemd/system/guacd.service; enabled; preset: enabled)
Active: active (running) since Mon 2025-08-18 00:01:43 UTC; 29s ago
Docs: man:guacd(8)
Main PID: 40106 (guacd)
Tasks: 1 (limit: 4548)
Memory: 10.0M (peak: 10.2M)
CPU: 64ms
CGroup: /system.slice/guacd.service
└─40106 /usr/local/sbin/guacd -f
Aug 18 00:01:43 ubuntu1 systemd[1]: Started guacd.service - Guacamole Server.
Aug 18 00:01:43 ubuntu1 guacd[40106]: Guacamole proxy daemon (guacd) version 1.6.0 started
Aug 18 00:01:43 ubuntu1 guacd[40106]: guacd[40106]: INFO: Guacamole proxy daemon (guacd) version 1.6.0 started
Aug 18 00:01:43 ubuntu1 guacd[40106]: guacd[40106]: INFO: Listening on host 127.0.0.1, port 4822
Aug 18 00:01:43 ubuntu1 guacd[40106]: Listening on host 127.0.0.1, port 4822
root@ubuntu1:~#
Configure Apache Guacamole 1.6.0 on Ubuntu 24.04
Guacamole has two major configuration files; /etc/guacamole which is referenced by the GUACAMOLE_HOME environment variable and /etc/guacamole/guacamole.properties which is the main configuration file used by Guacamole and its extensions.
There are also guacamole extensions and libraries configurations. You need to create the directories for these configs;
mkdir /etc/guacamole/{extensions,lib}Set the guacamole home directory environment variable and add it to /etc/default/tomcat9 configuration file.
echo "GUACAMOLE_HOME=/etc/guacamole" >> /etc/default/tomcat9Configure Guacamole Server Connections
To define how Guacamole connects to guacd, create the guacamole.properties file under /etc/guacamole directory with the following content.
vim /etc/guacamole/guacamole.propertiesguacd-hostname: localhost guacd-port: 4822 user-mapping: /etc/guacamole/user-mapping.xml auth-provider: net.sourceforge.guacamole.net.basic.BasicFileAuthenticationProvider After that, save the configuration file and link the Guacamole configurations directory to Tomcat servlet directory as shown below.
ln -s /etc/guacamole /usr/share/tomcat9/.guacamoleConfigure Guacamole Authentication Method
Guacamole’s default authentication method reads all users and connections from a single file called user-mapping.xml. In this file,you need to define the users allowed to access Guacamole web UI, the servers to connect to and the method of connection.
Therefore, run the command below to create this file with the following contents.
vim /etc/guacamole/user-mapping.xmlBe sure to replace password with your strong password.
<user-mapping> <!-- Per-user authentication and config information --> <!-- A user using md5 to hash the password guacadmin user and its md5 hashed password below is used to login to Guacamole Web UI--> <authorize username="guacadmin" password="5f4dcc3b5aa765d61d8327deb882cf99" encoding="md5"> <!-- First authorized Remote connection --> <connection name="CentOS-Server"> <protocol>ssh</protocol> <param name="hostname">192.168.56.156</param> <param name="port">22</param> </connection> <!-- Second authorized remote connection --> <connection name="Windows 7"> <protocol>rdp</protocol> <param name="hostname">192.168.56.122</param> <param name="port">3389</param> <param name="username">koromicha</param> <param name="ignore-cert">true</param> </connection> </authorize> </user-mapping> Generate the MD5 hash of passwords for the user used for logging into Guacamole web user interface. Replace you password accordingly;
echo -n password | openssl md5printf '%s' password | md5sumIf you need to explicitly define usernames and passwords, add the parameters;
<param name="username">USERNAME</param> <param name="password">PASSWORD</param>Save and exit the configuration file.
You can check how to enable Guacamole OpenLDAP Authentication;
Setup Apache Guacamole OpenLDAP Authentication
Restart both Tomcat and guacd to effect the changes.
systemctl restart tomcat9 guacdBe sure to check the syslog, /var/log/syslog or /var/log/tomcat9/CATALINA-* for any issues.
Test Apache Guacamole 1.6.0 from Browser

Upon successful login, you get to Apache Guacamole web dashboard and you should be able to see the added two connections, CentOS-Server and Window 7, defined in the file /etc/guacamole/user-mapping.xml.
Click on a connection to name to initiate remote login.
Configure Apache Guacamole MySQL Database Authentication
By default, Guacamole can use an XML file for user and connection authentication, as shown from previous section.
Guacamole supports providing authentication and storage leveraging any of the following databases:
Using a database for authentication/storage is highly recommended and provides additional features, such as the ability to use load-balancing groups, connection sharing links, and a convenient, web-based administrative interface.
You can install MySQL or MariaDB database preferably on the same system where Guacamole is running.
Use MySQL secure installation:
sudo apt install -y mysql-server mysql-client
Remove anonymous users
Disallow remote root login
Remove test database
Reload privileges
You can verify the version of MySQL installed by executing;
mysql -Vmysql Ver 8.0.43-0ubuntu0.24.04.1 for Linux on x86_64 ((Ubuntu))Therefore, running either of the commands below logs you in to MySQL server;
mysqlmysql -u rootEven when you run the command below, and press enter for empty password when prompted, you should still login.
mysql -u root -pOnce logged in to MySQL, you can as well check the version by executing the command;
mysql> SHOW VARIABLES LIKE "%version%";
Enable Password-Based on MySQL 8 Authentication
As mentioned above, MySQL 8 uses unix socket authentication plugin by default.
SELECT plugin from mysql.user where User='root';
+-------------+ | plugin | +-------------+ | auth_socket | +-------------+ 1 row in set (0.00 sec)
To enable password based authentication, you need to switch to MySQL native password plugin, mysql_native_password.
UPDATE mysql.user SET plugin = 'mysql_native_password' WHERE user = 'root' AND plugin = 'auth_socket';
Once that is done, reset root user password;
ALTER USER root@localhost identified with mysql_native_password by 'Password1234';
Reload privileges tables;
flush privileges;
Verify the changes;
SELECT User,plugin from mysql.user where User='root';
+------+-----------------------+ | User | plugin | +------+-----------------------+ | root | mysql_native_password | +------+-----------------------+ 1 row in set (0.00 sec)
Exit the database connection and try to login as root again;
mysql -u root
ERROR 1045 (28000): Access denied for user 'root'@'localhost' (using password: NO)
mysql
ERROR 1045 (28000): Access denied for user 'root'@'localhost' (using password: NO)
There you go. You have disabled no password authentication for MySQL root user on your localhost.
Configure MySQL DB for Guacamole
Create Guacamole Database and Database User
Login to your database system and create Guacamole database and database user (names used are not standard, hence feel free to change them, and of course the password);
mysql -u root -pcreate database guacd;create user guacd_admin@localhost identified by 'ChangeME';Grant SELECT, UPDATE, INSERT, and DELETE rights on Guacamole database tables to Guacamole database user;
grant SELECT,UPDATE,INSERT,DELETE on guacd.* to guacd_admin@localhost;Reload privilege tables;
flush privileges; quitInstall Guacamole database authentication extension
Download the Guacamole database authentication extension that matches your current version of Guacamole from the releases page.
VER=1.6.0wget https://dlcdn.apache.org/guacamole/${VER}/binary/guacamole-auth-jdbc-${VER}.tar.gzThe tarball comes with extensions for PostgreSQL, MySQL as well as SQL servers. 32MB.
Thus, extract only the MySQL extension;
tar xzf guacamole-auth-jdbc-${VER}.tar.gz guacamole-auth-jdbc-${VER}/mysqlCopy the Guacamole extension (.jar) file to GUACAMOLE_HOME/extensions directory;
cp guacamole-auth-jdbc-${VER}/mysql/guacamole-auth-jdbc-mysql-${VER}.jar /etc/guacamole/extensions/Next, Import Guacamole MySQL database schema (001-create-schema.sql and 002-create-admin-user.sql) into the Guacamole database created above;
mysql -u root -p guacd < guacamole-auth-jdbc-${VER}/mysql/schema/001-create-schema.sqlmysql -u root -p guacd < guacamole-auth-jdbc-${VER}/mysql/schema/002-create-admin-user.sqlInstall MySQL JDBC connector in the Guacamole lib directory;
wget https://dev.mysql.com/get/Downloads/Connector-J/mysql-connector-java-8.0.28.tar.gz tar xzf mysql-connector-java-8.0.28.tar.gzcp mysql-connector-java-8.0.28/mysql-connector-java-8.0.28.jar /etc/guacamole/lib/Configure Apache Guacamole MySQL Database Authentication
Next, configure Guacamole for database authentication by defining the following, at the very least, in the guacamole.properties file.
- Database hostname
- database name
- database user and password
cat >> /etc/guacamole/guacamole.properties << EOL auth-provider: net.sourceforge.guacamole.net.auth.mysql.MySQLAuthenticationProvider mysql-hostname: localhost mysql-database: guacd mysql-username: guacd_admin mysql-password: ChangeME EOL Guacamole can support multiple authentications methods. For example, you can use basic authentication alongside other authentication methods such as LDAP, database…
For example, in my setup, I am using both basic authentication and database authentication;
cat /etc/guacamole/guacamole.propertiesguacd-hostname: localhost guacd-port: 4822 user-mapping: /etc/guacamole/user-mapping.xml auth-provider: net.sourceforge.guacamole.net.basic.BasicFileAuthenticationProvider mysql-hostname: localhost mysql-database: guacd mysql-username: guacd_admin mysql-password: ChangeME There are other database account control settings. Refer to documentation.
Verify Guacamole Database Authentication
You can now restart your serverlet (Tomcat service) and login to Guacamole to test the database authentication;
systemctl restart tomcat9The default Guacamole database authentication credentials are:
- Username: guacadmin
- Password: guacadmin
Login to test.


版权声明:
作者:lichengxin
链接:https://www.techfm.club/p/224534.html
来源:TechFM
文章版权归作者所有,未经允许请勿转载。
共有 0 条评论