
CyberArk 12.1 Lab – 3. PVWA Installation
This post summarizes some steps to install PVWA (Password Vault Web Access) component.
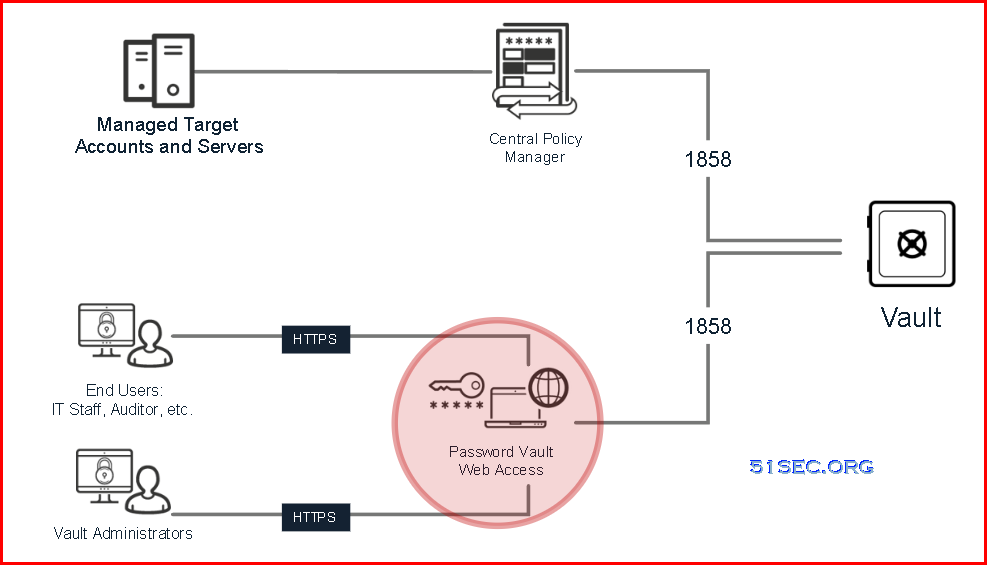
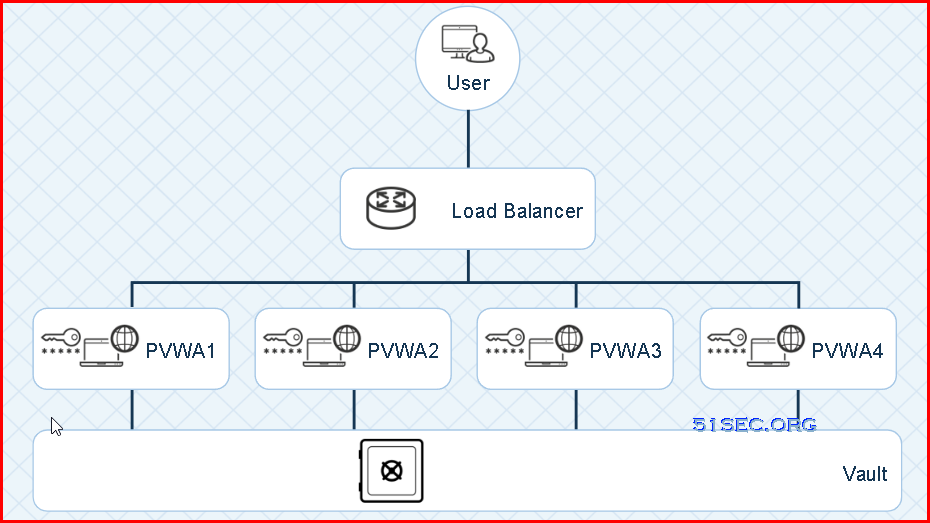
Diagram

System Requirements
Architecture
Pre-Installation Tasks
-
Copy the PVWA folder from the installation package to the component server, and unzip the folder.
-
In the InstallationAutomation folder, locate the PVWA_Prerequisites.ps1 file.
-
Open the PowerShell window, and run the PVWA_Prerequisites.ps1 file as an administrator.
Installation PVWA Using Scripts
The PVWA can be automatically installed and deployed using scripts, or installed by using the Installation wizard. CyberArk recommend that you use the automated scripts.
1 In the PVWA/InstallationAutomation/Installation folder, locate and open the InstallationConfig.xml file.
-
In the InstallationConfig.xml file, specify the following parameters
Parameter
Description
Username
The name of the user running the installation.
Valid values: Username
Company
The name of the company running the installation.
Valid values: Company name
PVWAApplicationDirectory
The location of the PVWA IIS web application.
Valid values: Pathname
Default value: C:/inetpub/wwwroot/PasswordVault/
PVWAInstallDirectory
The path where PVWA is installed.
Valid values: Pathname
Default value: C:/CyberArk/Password Vault Web Access/
PVWAApplicationName
The name of the PVWA IIS web application.
Valid values: Application name
Default value: PasswordVault
PVWAAuthenticationList
The authentication types that PVWA supports. Separate multiple values with semicolons (;).
Valid values: CyberArk, Windows, Radius, PKI, LDAP, Oracle SSO, SAML
Default value: CyberArk;
-
Some of the selected authentication types must be installed and configured on the Vault before they can be configured for the PVWA. For more information, see Authenticate to Privileged Access Manager .
-
Make sure that the administrator user for testing can authenticate to the Vault with one of the selected authentication methods so that you will be able to test the installation.
-
To customize third-party authentication servers, see Set up customized authentication modules.
pvwaUrl
The URL of the default PVWA to access.
Valid values: URL
Default value: https://127.0.0.1/PasswordVault
isUpgrade
Indicates whether the registration is for an upgrade or a clean installation.
Default value: False
Valid values: True/False
-
-
In the PVWA/InstallationAutomation/Registration folder, locate and open the PVWARegisterComponentConfig.xml file.
-
In the PVWARegisterComponentConfig.xml file, specify the following parameters
Parameter
Description
accepteula
Acceptance of the end user License agreement.
Valid values: Yes/No
vaultIP
The IP address or hostname of the Vault server.
When you register PVWA to a DR Vault environment, specify vaultip with <vault ip>,<DR ip>
Valid values: IP address or hostname
vaultport
The Vault’s configured communication port.
Recommended default Vault port: 1858Valid values: Port number
vaultuser
The name of the Vault user performing the installation.
Valid values: Username
We recommend using the Vault administrator user to install PVWA as this user has the appropriate Vault authorizations, and is created in the appropriate location in the Vault hierarchy.
For more information about the required authorizations, see Vault user authorizations.
Whether or not PVWA is installed in POC mode.
Valid values: True/False
authenticationlist
The authentication types that PVWA supports. Separate multiple values with semicolons (;).
Valid values: CyberArk, Windows, Radius, PKI, LDAP, Oracle SSO, SAML
installpackagedir
The full path to the installation package directory (the directory that includes setup.exe).
Edit this parameter only when pocmode is set to true.
Do not edit if pocmode is set to false.
Valid values: Pathname
vaultname
The name of the Vault where the PVWA configuration files will be stored.
Valid values: Vault name
virtualDirectoryPath
The root path of the web application.
Specify the same value as the PVWAApplicationDirectory parameter value in the InstallationConfig.xml file.
Default value: C:/inetpub/wwwroot/PasswordVault
Valid values: Pathname
configFilesPath
The path where the PVWA configuration files are installed.
Specify the same value as the PVWAInstallDirectory value in the InstallationConfig.xml file.
Default value: C:/CyberArk/Password Vault Web Access
Valid values: Pathname
pvwaUrl
The URL of the default PVWA to access.
Valid values: URL
isUpgrade
Indicates whether the registration is for an upgrade or a clean installation.
Default value: False
Valid values: True/False
PVWAApplicationName
The name of the PVWA IIS web application.
Default value: PasswordVault
Valid values: Application name
-
In PowerShell window run the PVWARegisterComponent.ps1 script as Administrator, and provide the Vault password in one of the following ways:
Method
Command
As a secure string (recommended)
CD “<installation package Path>InstallationAutomation/Registration” ./PVWARegisterComponent.ps1 -spwdObj <vaultpassword>
Using a Windows authentication window (recommended for manual runs)
CD “<installation package Path>InstallationAutomation/Registration” ./PVWARegisterComponent.ps1
As clear text (not recommended)
CD “<installation package Path>InstallationAutomation/Registration” ./PVWARegisterComponent.ps1 -pwd <vaultpassword>
Install PVWA Using Installation Wizard
-
On the PVWA machine, create a new folder, and copy the Password Vault Web Access folder from the installation package to the new folder.
-
Start the installation procedure by doing one of the following actions:
-
Double-click Setup.exe
-
On systems that are UAC-enabled, right-click Setup.exe, and then select Run as Administrator.
The Setup window appears.

Make sure you have closed any open Windows applications.
You can exit installation at any time by clicking Cancel. You can return to the previous installation window by clicking Back, where applicable.
-
-
Click Next and accept the terms of the License Agreement.
-
Read the license agreement, and then click Yes.
-
In the Customer Information window, enter your name and Company name in the appropriate fields, and then click Next.
-
In the Web application destination window, do one of the following actions:
-
Click Next to accept the default location where the PVWA will be installed (displayed in the Destination Folder area).
-
Click Browse, select another location, and then click Next.
-
-
In the Configuration files destination window, select the folder on your computer where the configuration and connection files for the PVWA will be installed. Do one of the following actions:
-
Click Next to accept the default location provided by the installation (as displayed in the Destination Folder area).
-
Click Browse, select another location, and then click Next.
Since some of the files under this folder require full access permissions by the user that runs the web application (for example, ASPNET/NETWORKSERVICE), it is highly recommended to leave the default location. Specifically, this location must not be changed to ‘wwwroot’ or ‘Program Files.
The Setup Type window appears.
-
-
Select the type of PVWA that you want to install, and then click Next.
-
Full Password Vault Web Access – Installs the PVWA for desktop browsers.
-
Mobile Password Vault Web Access – Installs a PVWA interface that is specifically for mobile devices.
-
-
In the Web application details window, enter the website name, application name, and authentication type(s) for the web application.
-
Select the site name from the list of installed site names. If the operating system does not support multiple web sites, the site name will be disabled and you will not be able to select from a list of additional site names.
-
Enter the application name or leave the default application name.
-
Select one or more authentication types that the PVWA supports.
■ Some of the selected authentication types must be installed and configured on the Vault before they can be configured for the PVWA. For more information, see Authenticate to Privileged Access Manager . ■ Make sure that the administrative user for testing can authenticate to the Vault with one of the selected authentication methods so that you will be able to test the installation. ■ To customize third party authentication servers, refer to Set up customized authentication modules. -
Select the default authentication method that the PVWA will display when users open the web browser.
-
Select the default authentication type that the Mobile PVWA will display when users access the Mobile PVWA URL.
-
To enable each user to display the authentication login page for their authentication method, select Remember last used authentication (requires cookies).
-
-
Click Next. If the application name has already been specified for a different application, the following message appears.
-
Click OK, and then change the application name.
The PVWA configures the installation.
-
Click Next to continue.
-
In the Vault connection details window, enter the connection details of the Password Vault and the PVWA.
-
Specify the IP or DNS address and the port number of the Password Vault.
For high availability implementations and DR: After installation, open the Vault.ini file and specify multiple Vault IP addresses, separated by commas, in the Address parameter. Currently there is no limit to the number of IP addresses that you can specify.
-
Specify the URL of the PVWA. For example, https://cyberark.com/PasswordVault.
In deployments that use a load balancer: Specify the URL of the PVWA's load balancer.
If the specified URL is invalid, the following message appears.
-
Click OK, and then enter the correct PVWA URL.
In deployments that support multiple PVWAs: Enter the URL of the PVWA. The installation process adds the URL to the ApplicationRoot parameter in the PVWA configuration file. If this URL is not yet entered, the installation will add it to the existing URL, separated by a comma.
-
-
Click Next.
The Vault’s username and password details window appears.
-
Enter the logon details of the Vault user.
If the Vault IP or the port number was not specified, the following message or a similar one appears.
-
Do one of the following actions:
-
Click Yes to skip to the end of the installation. You will have to create the PVWA environment later.
You can only use the PVWA after it is connected to the Vault (Registration step). To connect to the Vault, see Registration.
-
Click No to return to the Vault connection details window, and enter the Vault’s connection details, and then click Next.
-
-
-
In the Vault’s user name and password details window, enter the user name and password of the Vault user performing the installation, and then click Next.
The PVWA environment is created.
It is recommended to use the Vault Administrator user for this installation as this user has the appropriate Vault authorizations and is created in the appropriate location in the Vault hierarchy. For more information about the required permissions, see Vault user authorizations.
If the installation cannot use the specified user and password to log on to the Vault and complete the installation, this step appears again.
If the user name or password was not entered, the following message appears.
-
Do one of the following:
-
Click Yes to skip to the end of the installation. You will have to create the PVWA environment later.
This option is strongly not recommended.
-
Click No to return to the Vault’s username and password details window, enter the username and password, and then click Next to create the PVWA environment.
-
-
-
In the Setup Complete window, click Finish to complete the installation.
- Restart the machine.


Post-Installation
Hardening
- Before you run the hardening script, in the PVWA/InstallationAutomation folder, locate and open the PVWA_Hardening_Config.xml file, and set the IsPSMInstalled parameter to True.
- In a PowerShell window, run the PVWA_Hardening.ps1 script as Administrator.
Multiple PVWA installations
Multiple PVWAs in a single Vault environment
Load balancer requirements
-
The load balancer must not alter page content, or it should include a mechanism to prevent pages from being altered.
-
The load balancer must not alter the application path hierarchy (leave the default application path as it is).
-
The load balancer must support 'sticky sessions'.
Configure the PVWA to work with the load balancer
-
In the web.config file, for the LoadBalancerClientAddressHeader parameter, enter the HTTP Header field name from which the PVWA reads the client IP. For more information, see the LoadBalancerClientAddressHeader parameter in PVWA Parameter File (Web.config).
版权声明:
作者:lichengxin
链接:https://www.techfm.club/p/32324.html
来源:TechFM
文章版权归作者所有,未经允许请勿转载。
共有 0 条评论